notepad++安装plugin manager(默认不带)
下载:
https://github.com/bruderstein/nppPlugi ... r/releases
拷贝:
PluginManager.dll到plugins下
gpup到updater下
重启notepad++然后就可以安装NppExec了
注:如果用notepad++转换为ANSI编码编译后运行仍然无法去除乱码,那么你肯定忘保存了
Clangbuilder
下载以下安装包(所有和C++有关的安装包都安上)
Automated tools help developers on Windows platforms building LLVM and clang.
Installation
PowerShell Policy
Often you need to change the Power Shell execution policy
Get-ExecutionPolicy
Output:
Restricted
Please run PowerShell with
administrator rights, and Enter:
Set-ExecutionPolicy RemoteSigned
General Setup
Clone clangbuilder on Github
git clone
https://github.com/fstudio/clangbuilder.git clangbuilder
Click the
script/InitializeEnv.bat
The installation script will compile ClangbuilderUI and create a shortcut, download required packages.
然后在clangbuilder-master根目录下双击ClangbuilderUI 运行就OK了
注意编译时不要干别的否则会在Win10下黑屏
If your need install VisualCppTools.Community.Daily ,click
script/VisualCppToolsFetch.bat
Paste this code into the notepad++ run section
cmd /k cd $(CURRENT_DIRECTORY) && clang $(FILE_NAME) -o $(NAME_PART).exe && $(NAME_PART).exe && pause -std=c99
GLEW的安装
为了能够使用openGL的扩展库,我们可以安装glew来实现,介于本人痛苦的安装经历,我打算将我的成功安装心得告诉大家,希望大家能够免受软件的安装痛苦,更多的享受openGL的编程乐趣!!!
我的编译环境为VS2005,系统为win764位。首先我们可以到http://glew.sourceforge.net/下载最新的glew文件,将文件解压后将看到多个文件,将bin\release\Win32\glew32.dll放到C:\Windows\SysWOW64中,再将lib\release\x64里的文件复制到C:\\Program Flies(X86)\Visual Studio8\VC\Platform SDK\Lib中,再将include\GL\glew.h复制到C:\\Program Flies(X86)\Visual Studio8\VC\Platform SDK\Include\gl中。到这里我们还差一步。
在我们的工程文件里#include <gl/glew.h>
#include <GL/glut.h>
#include <stdlib.h>
#pragma comment(lib,"glew32.lib")
注意两点,一、glew.h要放在glut.h前
二、必须加上 #pragma comment(lib,"glew32.lib")
希望对大家能有所帮助!
GLEW是一个跨平台的C++扩展库,基于OpenGL图形接口。使用OpenGL的朋友都知道,window目前只支持OpenGL1.1的涵数,但 OpenGL现在都发展到2.0以上了,要使用这些OpenGL的高级特性,就必须下载最新的扩展,另外,不同的显卡公司,也会发布一些只有自家显卡才支 持的扩展函数,你要想用这数涵数,不得不去寻找最新的glext.h,有了GLEW扩展库,你就再也不用为找不到函数的接口而烦恼,因为GLEW能自动识 别你的平台所支持的全部OpenGL高级扩展涵数。也就是说,只要包含一个glew.h头文件,你就能使用gl,glu,glext,wgl,glx的全 部函数。GLEW支持目前流行的各种操作系统(including Windows, Linux, Mac OS X, FreeBSD, Irix, and Solaris)。
glu是实用库,包含有43个函数,函数名的前缀为glu。Glu 为了减轻繁重的编程工作,封装了OpenGL函数,Glu函数通过调用核心库的函数,为开发者提供相对简单的用法,实现一些较为复杂的操作。
glaux是OpenGL辅助库,包含有31个函数,函数名前缀为aux。这部分函数提供窗口管理、输入输出处理以及绘制一些简单三维物体。
glut是实用工具库,基本上是用于做窗口界面的,并且是跨平台(所以有时你喜欢做简单的demo的话,可以光用glut就ok了)
GLX:OpenGL extension for X.
对于X窗口系统,它所使用的的OpenGL扩展(GLX)是作为OpenGL的一个附件提供的,所有的GLX函数都使用前缀glX。
VS2017中nuget获取的glew安装包是需要新建一个Project并且保存ctrl+Shift+S才能下载的,因此推断并不会在编译clang时候作为一个功能来添加上,因此只能采用拷贝相应文件的方法进行安装
bin/glew32.dll to C:/windows/system32
lib/glew32.lib to D:/Programs/LLVM/lib/clang/4.0.0/lib/windows
include/GL/glew.h to D:/Programs/LLVM/lib/clang/4.0.0/include/GL
include/GL/wglew.h to D:/Programs/LLVM/lib/clang/4.0.0/include/GL
测试程序:
#include <windows.h>
#include <GL/glew.h>
// Add a main function
int main() {}
C语言究竟可不可以使用OpenGL编程?网上多的是VC++的,delphi的等等
可我就是不想学VC++,用C语言又不知道怎么初始化设置,好痛苦的。
比方说VC++中,是这样设置的:
1.将glut.dll和glut32.dll拷贝到windows/system32目录下。
2.将glut.h拷贝到集成环境安装目录的include/gl子目录下(如果不存在gl子目录,则创建它)。
3.将glut32.lib拷贝到集成环境安装目录的lib子目录下.
请进门的指点指点啊......
问题补充:
fengjian 兄台:
你推荐的《OpenGL 超级宝典》我下次就到图书馆去借
下面的话我不理解:
“最后在工程编译时,在工程中加入需要的库,有关命令行加入,glu32 opengl32 glut32库就可以编译了。 ”
我用C语言的时候,就是直接点run,一个简单的hello.c,怎么有工程的概念?上面的3个库glu32 opengl32 glut32加入到哪里,能不能说详细一点,拜托了
最佳答案
OpenGL就是基于C语言的,当然可以使用C语言。关于C语言的一本很好书籍为:《OpenGL 超级宝典》现在有第三版中译本,建议使用第二版。我就是靠它入门的。
你上面所说的步骤是正确的,最后在工程编译时,在工程中加入需要的库,有关命令行加入,glu32 opengl32 glut32库就可以编译了。
注意glut.h文件中已经包含gl.h,glu.h在实际编译中可以只加入头文件glut.h,很多相关的例子都是这样的,但是我在mingwstudio上编译发现,在glut.h前还是需要加入glu.h, gl.h.如:
#include <gl/gl.h>
#include <gl/glu.h>
#include <gl/glut.h>
才能成功编译
The OpenGL Extension Wrangler Library (
GLEW) is a cross-platform open-source
C/C++ extension loading library. GLEW provides efficient run-time mechanisms for determining which OpenGL extensions are supported on the target platform. OpenGL core and extension functionality is exposed in a single header file. GLEW has been tested on a variety of operating systems, including Windows, Linux, Mac OS X, FreeBSD, Irix, and Solaris.
GLX是OpenGL Extension to the X Window System的缩写。它作为x的扩展,是x协议和X server的一部分,已经包含在X server的代码中了。GLX提供了x window system使用的OpenGL接口,允许通过x调用OpenGL库。OpenGL 在使用时,需要与一个实际的窗口系统关联起来。在不同平台上有不同的机制以关联窗口系统,
在Windows上是WGL,在Linux上是GLX,在Apple OS上是AGL等。
如果是闭源就不能使用glew了而是使用如下配置文件(放置于/Programs/LLVM/lib/clang/4.0.0/include/GL目录下)
<GL/glext.h> - OpenGL 1.2 and above compatibility profile and extension interfaces.
• <GL/glcorearb.h> - OpenGL core profile and ARB extension interfaces, as described in appendix G.2 of the OpenGL 4.3 Specification. Does not include interfaces found only in the compatibility profile.
另外windows自带了gl.h和glu.h(在C盘搜索就行,不然就安装VS2017 Community版再搜索就有了)
常见的OpenGL头文件如下:(Windows系统中可以忽略大小写的区别,我自己也没太注意大小写。同时,文件的路径可能变化,例如不是<GL/gl.h>而是"gl.h",具体情况要看你到底把头文件放到哪了)
<GL/gl.h>:OpenGL所使用的函数和常量声明。
<GL/glu.h>:GLU(OpenGL实用库)所使用的函数和常量声明。GLU库属于OpenGL标准的一部分。(以下各种库则不属于)
glu: This is OpenGL utilities library, which has been not updated for long time. Don't need to use this header file.
<GL/glaux.h>:GLAUX(OpenGL辅助库)所使用的函数和常量声明。这个库提供了创建窗口,处理键盘和鼠标事件,设置调色板等OpenGL本身不提供,但在编写OpenGL程序时又经常用到的功能。
目前这个库已经过时,只有比较少的编译环境中有提供,例如VC系列。在VC系列编译器中,使用这个头文件之前必须使用#include <windows.h>或者具有类似功能的头文件。
<GL/glut.h>:GLUT(OpenGL实用工具包)所使用的函数和常量声明。这个库的功能大致与GLAUX类似,目前许多OpenGL教程使用这个库来编写演示程序。一些编译系统可能不直接提供这个库(例如VC系列),需要单独下载安装。这个头文件自动包含了<GL/gl.h>和<GL/glu.h>,编程时不必再次包含它们,
非开源,GLUT is not open source. Mark Kilgard maintains the copyright
<GL/glext.h>:扩展头文件。因为微软公司对OpenGL的支持不太积极,VC系列编译器虽然有<GL/gl.h>这个头文件,但是里面只有OpenGL 1.1版本中所规定的内容,而没有OpenGL 1.2及其以后版本。对当前的计算机配置而言,几乎都支持OpenGL 1.4版本,更高的则到1.5, 2.0, 2.1,而VC无法直接使用这些功能。为了解决这一问题,就有了<GL/glext.h>头文件。这个头文件提供了高版本OpenGL所需要的各种常数声明以及函数指针声明。
<GL/wglext.h>:扩展头文件。与<GL/glext.h>类似,但这个头文件中只提供适用于Windows系统的各种OpenGL扩展所使用的函数和常量,不适用于其它操作系统。
"glee.h":GLEE开源库的头文件。它的出现是因为<GL/glext.h>虽然可以使用高版本的OpenGL函数,但是使用的形式不太方便。GLEE库则让高版本的OpenGL函数与其它OpenGL函数在使用上同样方便。需要注意的是,这个头文件与<GL/gl.h>是冲突的,在包含"glee.h"之前,不应该包含<GL/gl.h>。
#include <GL/glut.h>
#include "glee.h" // 错误,因为glut.h中含有gl.h,它与glee.h冲突
// 但是如果把两个include顺序交换,则正确
"glos.h":虽然这个也时常见到,但我也不知道它到底是什么,可能是与系统相关的各种功能,也可能只是自己编写的一个文件。我曾经看到一个glos.h头文件中只有一句#include <GL/glut.h>。
glut : 提供对窗口的封装,这是跨平台窗口的,我们就不必自己去编写烦琐的窗口代码。
glee : 方便用来判断当前系统是不是支持某项OpenGL特性,我们就不用自己去写烦琐的先取函数地址然后再判断的代码了。
glew : 因为windows默认只支持OpenGL 1.1,你要想用更高版本的OpenGL,你就需要安装它,它能自动识别你的平台所支持的全部OpenGL高级扩展函数。
OpenGL函数采用了以下格式:
<库前缀><根命令><可选的参数个数><可选的参数类型>
库前缀有gl、glu、aux、glut、wgl、glx、agl等等,分别表示该函数属于OpenGL那个开发库,从函数名后面中还可以看出需要多少个参数以及参数的类型。I代表int型,f代表float型,d代表double型,u代表无符号整型。例如glVertex3fv()表示了该函数属于gl库,参数是三个float型参数指针。我们用glVertex*() 来表示这一类函数。
OpenGL函数库相关的API有核心库(gl)、实用库(glu)、辅助库(aux)、实用工具库(glut)、窗口库(glx、agl、wgl)和扩展函数库等。从图可以看出,gl是核心,glu是对gl的部分封装。glx、agl、wgl 是针对不同窗口系统的函数。glut是为跨平台的OpenGL程序的工具包,比aux功能强大。扩展函数库是硬件厂商为实现硬件更新利用OpenGL的扩展机制开发的函数。
查看opengl版本的工具:opengl extension viewer
http://realtech-vr.com/admin/glview
头文件相当于你告诉别人,我这有个功能你可以按照这个格式调用,具体怎么实现的你不用关心,你用我做好的库就行了。
自己写代码的时候也是这么用。比如,你有一个规模很大的程序,包含了比如统计,日历,文本处理很多不同种类的功能。如果你把所有的函数都写在一个巨大的c文件里也行,但是读起来特别累,也不好调试,这时我们就可以考虑把不同种类的功能放在不同的c文件里,分门别类。那放在不同的文件里的函数如何调用对方呢?这时候我们用头文件做声明,告诉a文件如果包含了b文件的头文件,那么a就能调用b的功能。
#ifndef <标识>#define <标识>
............
#endif
<标识>在理论上来说可以是自由命名的,但每个头文件的这个“标识”都应该是唯一的。标识的命名规则
一般(如果需要:大小写都可以,习惯大写,约定俗成用大写,以此与小写的普通变量区分开来.当然如果你故意小写,也是合法的.不过如果你想让你写的程序具有高可读性,那最好遵守此约定)是头文件名全大写,前后加下划线,并把文件名中的“.”也变成下划线,如:delay.h
#ifndef _DELAY_H_#define _DELAY_H_
......
#endif
这一个在一般的小型程序中经常用到,在做单片机的的程序时,经常把一些可以独立的模块写成头文件,方便程序的阅读和移植。
我看了老长时间的书,终于明白
为什么是:#ifndef _DELAY_H_#define _DELAY_H_
而不是: #ifndef DELAY.H #define DELAY.H
//////////////////////////
因为,后者,定义一个名称,是用于一个程序中或者头文件中的,名称定义
前者,是关于头文件包含的,不是名称定义的。用下划线代替“.”,是没有办法的办法,只有这样才能防止混乱。
前者的意思是,如果没有包含了这个头文件,就包含它。
后者的意思是,如果没有定义这个名称,就定义它。
其实就是换一种写法 以区分两种意思。
两者是不一样的意思。
#error命令是C/C++语言的预处理命令之一,当预处理器预处理到#error命令时将停止编译并输出用户自定义的错误消息。
#if vs. if(
#if用于预处理命令常与#define,#else等连用,而if用于逻辑判断,如if(x>1){}; )
条件编译是C语言中预处理部分的内容,它是编译器编译代码时最先处理的部分,
条件编译里面有判断语句,比如 #if 、#else 、#elif 及 #endif
它的意思是如果宏条件符合,编译器就编译这段代码,否则,编译器就忽略这段代码而不编译,如
#define A 0 //把A定义为0
#if (A > 1)
printf("A > 1"); //编译器没有编译该语句,该语句不生成汇编代码
#elif (A == 1)
printf("A == 1"); //编译器没有编译该语句,该语句不生成汇编代码
#else
printf("A < 1"); //编译器编译了这段代码,且生成了汇编代码,执行该语句
#endif
而 if 语句则不然,if 是 C 语言中的关键字,它根据表达式的计算结果来觉定执行那个语句,它里面的每个分支都编译了的, 如
#define A 0
if (A > 1)
printf("A > 1"); //编译器编译该语句,但因为A == 0 未执行
else if(A == 1)
printf("A == 1"); //编译器编译该语句,但因为A == 0 未执行
else
printf("A < 1"); //编译器编译该语句,因为A == 0 故执行
作为一个编译“开关”,比如:
#if(条件满足)
执行代码1
#else
执行代码2
#endif
假如编译时,确实满足条件,则生成的程序文件(.exe文件)中不会有执行代码2的。如果用普通if语句,生成的程序文件就会有执行代码2,这个区别看看生成文件大小就可以知道。如果你的条件在程序编译前就已经确定了,那就用#if;如果条件需要在程序运行过程中才能判断,则用if。
所以 简单地讲,条件编译是根据 宏条件 选择性地编译语句,它是编译器在编译代码时完成的;
条件语句是根据条件表达式选择性地执行语句,它是在程序运行时进行的。
#if的使用说明
#if的后面接的是表达式
#if (MAX==10)||(MAX==20)
code...
#endif
它的作用是:如果(MAX==10)||(MAX==20)成立,那么编译器就会把其中的#if 与 #endif之间的代码编译进去(注意:是编译进去,不是执行!!)
#if defined的使用
#if后面接的是一个宏。
#if defined (x)
...code...
#endif
这个#if defined它不管里面的“x”的逻辑是“真”还是“假”它只管这个程序的前面的宏定义里面有没有定义“x”这个宏,如果定义了x这个宏,那么,编译器会编译中间的…code…否则不直接忽视中间的…code…代码。
另外 #if defined(x)也可以取反,也就用 #if !defined(x)
#ifdef的使用
#ifdef的使用和#if defined()的用法一致
#ifndef又和#if !defined()的用法一致。
最后强调两点:
第一:这几个宏定义只是决定代码块是否被编译!
第二:别忘了#endif
#ifdef MY_PRINTF_STANDARD=#if defined(MY_PRINTF_STANDARD)
#else指令用于某个#if指令之后,当前面的#if指令的条件不为真时,就编译#else后面的代码。#endif指令将终止上面的条件块。#elif预处理指令综合了#else和#if指令的作用。
中文名
#elif
使用
用于某个#if指令之后
#elif
使您得以创建复合条件指令
预处理指令
综合了#else和#if指令的作用。
#elif 使您得以创建复合条件指令。如果前面的 #if 和前面的任何 #elif(可选)指令表达式的计算结果都不是 true,则将计算 #elif 表达式。如果 #elif 表达式计算为 true,编译器将计算位于 #elif 和下一个条件指令之间的所有代码。例如:
#defineVC7//...
#ifdebug
Console.Writeline("Debugbuild");
#elifVC7
Console.Writeline("VisualStudio7");
#endif
可以使用运算符 ==(相等)、!=(不相等)、&&(与)及 ||(或)来计算多个符号。还可以用括号将符号和运算符分组。
#elif 等效于使用:
#else
#if
使用 #elif 更简单,因为每个 #if 都需要一个 #endif,而 #elif 即使在没有匹配的 #endif 时也可以使用。
有关如何使用 #elif 的示例,请参见 #if。
Microsoft Windows要求在gl.h或glu.h之前包含windows.h头文件,因为MicrosoftWindows版本的gl.h和glu.h文件内部使用的一些宏是在windows.h中定义的。
简单办法,先写完整程序,再把一部分抽出去,抽出去的存到 自己的头文件里,在抽出的地方写 #include ...
例如,完整程序(计算平均值):
#include<stdio.h>
double mean(double *y, int N){
int i;
double s=0.0;
for (i=0;i<N;i++) s=s+y
;
s = s / (double) N;
return s;
}
void main()
{
double x[10]={1,2,3,4,5,6,7,8,9,10};
printf("mean = %lf\n", mean(x,10));
}
----------------------------------------------
抽出部分 存入 a_x.h :
double mean(double *y, int N){
int i;
double s=0.0;
for (i=0;i<N;i++) s=s+y;
s = s / (double) N;
return s;
}
--------------------------------
程序变:
#include<stdio.h>
#include "a_x.h"
void main()
{
double x[10]={1,2,3,4,5,6,7,8,9,10};
printf("mean = %lf\n", mean(x,10));
}
=============================================
你要是愿意随便抽一块也可以,例如抽出(也叫 a_x.h):
double mean(double *y, int N){
int i;
double s=0.0;
for (i=0;i<N;i++) s=s+y;
s = s / (double) N;
return s;
}
void main()
{
------------------------
程序变:
#include<stdio.h>
#include "a_x.h"
double x[10]={1,2,3,4,5,6,7,8,9,10};
printf("mean = %lf\n", mean(x,10));
}
==============================
语法上,功能上,两种抽法都可以。但第一种方法较好--程序可读性好,不易出错。
一般情况下,头文件里放 函数原型,全局量声明 和 函数定义。
一般用于将C++代码以标准C形式输出(即以C的形式被调用),这是因为C++虽然常被认为是C的超集,但是C++的编译器还是与C的编译器不同的。C中调用C++中的代码这样定义会是安全的。
一般的考虑跨平台使用方法如下:
#ifdefined(__cplusplus)||defined(c_plusplus) //跨平台定义方法
extern "C"{
#endif
//... 正常的声明段
#ifdefined(__cplusplus)||defined(c_plusplus)
}
#endif
简单的用在windows下可以如下定义:
#ifdef __cplusplus
extern "C"{
//... 正常的声明段
}
#endif
a>b ? printf("a比b大!\n") : printf("b比a大!\n");
相当于:
[plain] view plaincopy
if(a>b)
{
printf("a比b大!\n");
}
else
{
printf("a不比b大!\n");
}
C语言有一种数据类型叫结构体,其定义格式为:
struct 结构体名 {
结构体成员变量定义;
};
有几种访问结构体的方法:
访问结构成员的运算符有两种,一种是结构成员运算符“·”,也称为“圆点运算符”,另一种是结构指针运算符“->”,也称“箭头运算符”。
结构成员运算符通过结构变量名访问结构体的成员。例如:
printf("%s",student.name);
结构指针运算符由减号“-”和“>”组成(中间没有空格),它通过指向结构的指针访问结构的成员。假定声明了指向struct student的指针sPtr,并且把结构student1的地址赋给了sPtr,如下列语句通过指针sPtr打印了结构student1的成员name:
printf("%s",sPtr->name);
不要在结构指针运算符的-和>之间插入空格。
在用指针(->)和结构成员运算符(.)引用结构成员时一定要用圆括号(*sPtr).name,因为结构成员运算符“.”比指针复引用运算符“*”的优先级高,所以圆括号是必须的。
下面的程序演示了结构成员和结构指针运算符的用法:
#include<stdio.h>
struct student
{char *name;
char *sex;
int age;
};
main()
{
char i;
struct student student1;
struct student *sPtr;
student1.name="Tom";
student1.sex="male";
student1.age=18;
sPtr=&student1;
printf("%s%s%s\n%s%s%s\n%s%s%s\n",
student1.name,"'s sex is",student1.sex,
sPtr->name,"'s sex is",sPtr->sex,
(*sPtr).name,"'s sex is",(*sPtr).sex);
i = student1.age;
printf("\n\n\ni=%d||student1.age=%d||(*sPtr).age=%d",i,student1.age,(*sPtr).age);
return 0;
}
1、%lf 双精度浮点型,也就是double型的格式,默认保留6位小数。
如:double a = 1.2; printf("%lf",a); //1.200000。
2、%.2lf 同上,不过限制了,值保留2位小数。
如:double a = 1.2345; printf("%.2lf",a); //1.23。
3、%.2f 表示单精度浮点型,也就是float型的格式。
如:float a = 1.2731; printf("%.2f",a); //1.27。
下面的例子:
int main() {
func();
}
void func() {...}
会报错,如果把func放在main()函数前,在main()调用它之前先定义,那么就ok,why? 因为编译器发现一个不认识的函数调用,不知道该函数的返回类型,就假设为int类型,等后面编译的时候编译器看到实际的函数,它认为有两个同名的函数,一个是文件中的函数,一个是编译器假设返回int的那个
如何去避免呢:有没有办法让编译器一开始就知道函数的返回值类型呢?为了防止编译器假设函数的返回类型,你可以显式地告诉它。告诉编译器函数会返回什么类型的语句就叫函数声明。
1.声明与定义分离
float func(int age);
函数声明包括:函数名,返回值类型,形参类型,以;结束,没有函数体.
一旦声明了函数,编译器就不需要假设,完全可以先调用函数,再定义函数。
对于上面的问题,可以这样写:
int main(int argc, char *argv[]) {
void func(); //声明
func();
return 0;
}
void func(){
printf("come on baby!");
}
如果有多个这样的玩意,我们就需要在main函数中一次次的声明,比较好的方式是可以放在头文件
2.头文件
创建头文件,func.h, 将函数声明写在此:
#ifndef intoC_func_h
#define intoC_func_h
void func();
#endif
然后上面程序就可以在main函数中不用再函数声明(不是定义!!!,只是不用声明了但是仍需定义!)了.
Create C Program with Dynamic Link Library (DLL) using Visual Studio 2012 (Implicit Link)
The following procedure is to create a C program with a dynamic link library using Microsoft Visual Studio Express 2012.
Brief Introduction to Dynamic Link Library (DLL)
The important difference between DLL and static library is that the code of external function is stored in the DLL file, whereas when linking with static library, the code of the external functions is copied to the execution file of the application program. With static library, you just need an execution file whereas with DLL you need both the execution file and the DLL file for the program to work.
Implicit or Explicit Link
When creating DLL, we have the choice of implicit linking or explicit linking. Since implicit linking is easier and common, this article will focus on implicit linking. For additional information please refer to the following:
Linking Implicitly
Linking Explicitly
Determining Which Linking Method to Use
Examples:
The following example is a normal C program with functions without using any custom static library.
#include <stdio.h>
#define PI 3.1415
double PowerOf2 (double UserNumber);
double PowerOf3 (double UserNumber);
double CircleArea (double UserRadius);
double CircleCircum (double UserRadius);
int main ( )
{
double p2 = 10.0;
double p3 = 5.0;
double radius = 4.0;
printf ("The number %.2f to the power of 2 is %.2f. \n", p2, PowerOf2(p2));
printf ("The number %.2f to the power of 3 is %.2f. \n", p3, PowerOf3(p3));
printf ("A circle with a radius of %.2f, the area is %.2f. \n", radius, CircleArea(radius));
printf ("A circle with a radius of %.2f, the circumference is %.2f. \n", radius, CircleCircum(radius));
return 0;
}
double PowerOf2 (double UserNumber)
{
return UserNumber * UserNumber;
}
double PowerOf3 (double UserNumber)
{
return UserNumber * UserNumber * UserNumber;
}
double CircleArea (double UserRadius)
{
return UserRadius * UserRadius * PI;
}
double CircleCircum (double UserRadius)
{
return 2 * UserRadius * PI;
}
We will use the above example to create a dynamic link library and an application program that use this library. We will place the DLL in a shared public folder and place the application in the personal document folder.
To create a dynamic link library, it consist of 2 files MyMathDll.h and MyMathDll.c
To create Dynamic Link Library
Step 1: Create a new project as dynamic link library
Create a new project using MyMathDll as project name
.png (40.71 KiB) 查看 16573 次")
Click "OK". Then click "Next". On following screen you need to specify that you are creating a DLL and make sure you check Empty project.
Step 2: Create the headers file
Under Solution Explorer, right click Headers Files >> Add >> New Item as shown below.
Select header file as file type and rename the header file to MyMathDll.h
Click "Add".
Add the following to the headers:
#ifdef MYMATHDLL_EXPORTS
#define MYMATHDLL_API __declspec(dllexport)
#else
#define MYMATHDLL_API __declspec(dllimport)
#endif
#define PI 3.1415
MYMATHDLL_API double PowerOf2 (double UserNumber);
MYMATHDLL_API double PowerOf3 (double UserNumber);
MYMATHDLL_API double CircleArea (double UserRadius);
MYMATHDLL_API double CircleCircum (double UserRadius);
The dllexport and dllimport attributes are extensions to the C and C++. You can use them to export and import functions to or from a DLL. When the MYMATHDLL_EXPORTS symbol is defined, the MYMATHDLL_API symbol will set the __declspec(dllexport) modifier in the member function declarations. This enables the function to be exported by the DLL so that it can be used by other applications. When MYMATHDLL_EXPORTS is undefined, MYMATHDLL_API defines the __declspec(dllimport) modifier in the member function declarations. This enables the compiler to optimize the importing of the function from the DLL for use in other applications. By default, MYMATHDLL_EXPORTS is defined when the MyMathDll project is built.
You can also define the header file this way.
#define PI 3.1415
__declspec(dllexport) double PowerOf2 (double UserNumber);
__declspec(dllexport) PowerOf3 (double UserNumber);
__declspec(dllexport) CircleArea (double UserRadius);
__declspec(dllexport) double CircleCircum (double UserRadius);
For further information on dllexport and dllimport please refer to this article.
Step 3: Create the Implementation Program
Under Solution Explorer, right click Source Files >> Add >> New Item. Rename the program to MyMathDll.c.
Enter the source code as follows
#include "MyMathDll.h"
double PowerOf2 (double UserNumber)
{
return UserNumber * UserNumber;
}
double PowerOf3 (double UserNumber)
{
return UserNumber * UserNumber * UserNumber;
}
double CircleArea (double UserRadius)
{
return UserRadius * UserRadius * PI;
}
double CircleCircum (double UserRadius)
{
return 2 * UserRadius * PI;
}
Step 4: Build solutions
Build solutions. You should have result as follows:
Once the compilation is complete, close the project.
Create a C Application Program Using DLL
Step 1: Create a new project
Create a new project using the name MyApp3 with Console Application as options. Remember to clear all headers and checked Empty Project.
Step 2: Establish Link with the Static Library
Under Solution Explorer, right click and select Add >> Existing Projects
Navigate to the project folders of MyMathDll and select the project file MyMathDll.vcxproj and click Open.
Your solution explorer should show two projects like below:
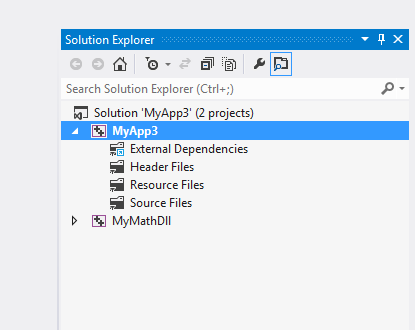
- dll (8).png (10.59 KiB) 查看 16573 次
Select MyApp3, right click and select properties. Under Common Properties, select Framework and References. Click "Add New Reference"
You should see the following screen, there should be a project named "MyMathDll". Check the project as shown below and click "OK".
On the properties page, under Configuration Properties >> C/C++ expand the list in C/C++ and select "General" as shown below.
For first line "Additional Include Directories", click the arrow and select edit. The following dialog box shows:
Click the "New Line" icon and click on the button "...". Now you need to navigate to the DLL folder. Do not select the folder "MyMathDll" under Projects, drill one level down and select the folder "MyMathDll". The purpose is to the select the folder that contain the header file. Highlight the folder and click Select Folder.
Click OK. Then click Apply. You can close the property dialog box.
Step 3: Create the application program
Under Solution Explorer, right click Source Files >> Add >> New Item. Rename the program to MyApp3.c.
Enter the following program:
#include <stdio.h>
#include "MyMathDll.h"
int main ( )
{
double p2 = 10.0;
double p3 = 5.0;
double radius = 4.0;
printf ("The number %.2f to the power of 2 is %.2f. \n", p2, PowerOf2(p2));
printf ("The number %.2f to the power of 3 is %.2f. \n", p3, PowerOf3(p3));
printf ("A circle with a radius of %.2f, the area is %.2f. \n", radius, CircleArea(radius));
printf ("A circle with a radius of %.2f, the circumference is %.2f. \n", radius, CircleCircum(radius));
return 0;
}
Step 4: Build the solution.
After you have built the solutions, you should received a message similar to the one below. Please note that two projects are being built.
Step 5: Run the program
You can test the project from the command prompt as shown below:
Additional Note:
Please note that for the successful execution of the program. MyApp3.exe and MyMathDll.dll should be in the same folder. Alternatively, the MyMathDll.dll should be located where the Windows system could find. The search path the DLL files for Windows are as follows:
The directory where the exe file is located.
The Windows system directory.
The Windows directory.
The directories listed in the PATH environment variable.
This completes the procedure for creating a DLL in C using Visual Studio Express 2012. Please note that the procedure for creating similar DLL using command line is different from using the IDE.
#pragma once是一个比较常用的C/C++杂注,只要在头文件的最开始加入这条杂注,就能够保证头文件只被编译一次。
如果编译失败那么把所有cpp文件改成c后缀的文件